Monday 29 October 2012

"How to Calculate Your Bust Dart Size: The Formula that Takes the Guess-work out of FBAs and SBAs"

When you look in Pattern-making books they usually have a table of standard measurements including either the bust dart width, or it's angle in degrees. These "standard measurements" are for a B-cup, which means that if you are not a B-cup, you have to draft the pattern and then do either a Small Bust Adjustment or a Full Bust Adjustment.

But how do they get these numbers? They seem to have nothing to do with the rest of the measurements. But there is always a formula. It just takes a bit of working out.

What is a bust dart's function? As I see it, a bust dart is there to make the longer front pattern piece match the shorter back pattern piece at the side seam. The front pattern piece is longer than the back one because it has your bust to go over and the back doesn't.


So to find out the bust dart's width at the side seam,

  1. you measure your front from the neck point the red dot over the apex (the green dot on the drawing), and thence straight down to your waistline = F; (this measurement is the orange line in the picture)
  2. then measure from the red dot down your back to your waistline = B; (this is the red line)
  3. subtract B from F and you have your bust dart width, which is the difference between your front bodice length, and your back bodice length.

Now for a little trigonometry. Scientific calculators at the ready!

We'll split the bust dart into two equal parts so that we have two right angle triangles:

The difference between my front measurement and my back measurement is about 2 cm (halved to 1 cm for the split triangle), and the side dart length is about 13 cm on me.

How to Find Your Bust Dart Angle for Patternmaking in Fashion

If you are using the German method of pattern making, which is briefly taught in Patternmaking in Fashion by Lucia Mors de Castro (mine cost about £40 but it now costs £100 at Amazon due to high demand - I think it is over-priced now by very greedy sellers), you will need the angle of the bust dart, and as we have the length of the dart (the hypotenuse) and the width of the dart (the length "opposite" the angle) we can find the Sine of the angle (sin = O/h) and then use the sin-1 function on our scientific calculators to find the angle. Thus:-

How to Find Your Bust Dart Width for Metric Pattern Cutting

If you are using Metric Pattern Cutting for Women's Wear by Winifred Aldrich, or the instructions on www.BurdaStyle.com, you will want to find the bust dart width for a shoulder dart.
  1. Take the sine you found earlier (here 0.077) and multiply it by your neck to apex measurement (on me about 24 cm) to get half your total bust dart width. (Here, about 1.84 cm). 
  2. Get your total bust dart width by doubling this number = 3.68 cm, roughly 3.7 cm.

So that is my bust dart: 3.7 cm wide at the neck point and 8.8 degrees (which can be rounded to 9 degrees for practical reasons).

So that is how you work out your personal bust dart measurement. Isn't it so much better than using a "standard" measurement?

I hope it helps. : )

Sabrina

Labels: ,

Sunday 6 May 2012

How to do a Small Bust Adjustment (SBA) on Your Metric Pattern Cutting Close Fitting Block/Sloper

I have been scouring the web the past few days, and looking in my sewing and pattern making books for how to do a small bust adjustment, but none of the tutorials helped very much. So I figured it out myself, and it's so easy (now)!

So I thought I'd do a tutorial for other slim sewists, especially those of you who use Metric Pattern Cutting for Womens Wear by Winifred Aldrich.

Benefits of this SBA Method

  • This method does not require you to cut up your original pattern, so if you have to do it again, you don't have to redraft your sloper. It uses the pivot and trace method of pattern making and can be done in a matter of minutes.
  • It also does not affect the bust measurement of your pattern, so if you have the right width and the the correct amount of ease, you will maintain that, and simply reduce the cup size!
  • Neither does it alter the waistline in anyway. All the alteration is done in the top of the bodice, so it's great if you have a good fit otherwise on your one-piece dress block.
I will mention ahead of time though, that this method works best if you use a master pattern and develop your designs from that. I don't really know how to alter patterns using a master pattern.

How to Do a SBA (Small Bust Adjustment) The Quick, Easy, and Sensible Way


You will require your sloper to have the bust dart in it's original position at the neck point.

1. Lay some tracing paper over your front sloper (I'm using Burda Tracing Tissue Paper) and weight it down. Here I have drawn over the original sloper on Microsoft Paint because it was hard to see in the photograph.


2. Starting at the bust point, trace the sloper up to the neck point, along the neck line, down the centre front, along the waist line including the dart, and up the side seam, stopping at the armhole point.

Mark a line at the top of the pattern 1cm down from the neck point and perpendicular to the CF. 1cm is the amount we will be reducing the pattern's length. Don't worry about the neckline; that will be sorted out later.

3. Put a pin in the pivot point and, with the tracing paper stationary (pun intended), swivel the original pattern underneath until the neck point on the shoulder line meets the line you drew in step 2.

Continue tracing your sloper, around the armscye and along the shoulder line.

When you get to the pink line in this photo, take your ruler and draw a line from the shoulder-neck point where you are, to the original bust point.

4. Lower the neckline at the shoulder point to the line you drew in step 2, and at the CF by 1cm to match. Redraw the neckline curve (or shift the tracing paper up 1cm and trace it.

The red lines in this photo are the new pattern, and the black lines are the original pattern. See how much narrower the dart is? That's the difference between cup sizes, that and the pattern's front length. We slimmer sewists simply don't need all that extra fabric.


You will be delighted with the difference this one, quick, simple alteration makes to your finished garments! Do this alteration before you do any others, then do any other length alterations, then width alterations. I speak from personal experience here. If your bodice is too short above the waist, it will look like the waistline is miles too big. Lower it to its proper place and voilá! Like magic it looks so much better!

So that is my method for how to do a small bust adjustment on your Metric Pattern Cutting Close Fitting Block/Sloper. It wasn't mentioned in Winifred Aldrich's book, so here is is for you. I hope it helps you as much as it will help me. Isn't it exciting to think you have a master pattern that fits and you can develop any design from it? : D

Until next time, happy sewing and pattern making!
Sabrina Wharton-Brown
The Sewing Corner

P.S. In case you wondered what I got for my birthday, I got Threads DVD-ROM Archive 1985-2011 (lots of great information once Mum got it to work for me on the computer) and the free book (FAST FIT by Sandra Betzina) which was on offer with it. My brother also got me The Magic by Rhonda Byrne of The Secret. He search Hull for it. Isn't he thoughtful? : ) It's a great book and I recommend it so far. It's certainly a pick-me-up.

Labels: ,

Saturday 24 March 2012

How to Make a Dress Part 12: How to Make and Insert the Inset and Hem the Dress

This is the last post in this series. All that is left now is to make and insert the inset and to hem the dress.

How to Make the Inset

Get your two inset pieces and put them RS together. Sew along the top edge (in this case the one with the slightly concave curve). Press flat then open.

The piece without the interfacing is the facing in this case. (For blouse fronts etc. the interfacing goes on the facing.)

Clip into the seam allowances. Press the seam allowances to the facing side (the one without interfacing).

Sew the seam allowances to the facing. This is called machine understitching.

Fold the pieces into the finished position (see below).

This is what it looks like facing side up.
And this is what it looks like front side up.

I haven't done so in this photo, but it helps with the next step if you baste the layers of the inset together.

Also, you should zigzag the raw edges to stop them from fraying.


How to insert the inset
This is where it gets tricky.

Pin the inset in place by lifting the collar up as in this photo and pinning through all the layers.

Now firmly baste in place by hand with cross stitches and then stitch one side by machine under the collar so that it's inconspicuous. If you think the inset is in place, repeat for the other side.

Note: You won't be able to stitch all the way down, so just go as far as your judgement suggests.


How to Hem the Dress
This dress has a 3cm (1 1/4") hem allowance. I pinned the hem level.

Clip into the seam allowances at the hem level to give a better edge.

When you have pinned all around, turn up the hem so that the pins are right on the edge. Then, holding the fold in place, remove the pin and pin the hem allowance down.

Now hand sew running stitches in the hem allowance only, and pull so that the hem allowance lies flush with the dress.

Baste the hem allowance to the dress.

This is what I call a hand coverstitch. It's basically an overcasting stitch where you catch one thread of the dress. Then you just repeat all the way around. If you need to start a new thread, secure both your old thread and your new one on the hem allowance.

Press.

Congratulations! Your dress is finished!

Until next time, happy sewing and Merry Christmas!
Sabrina Wharton-Brown
The Sewing Corner, 41 Market Place, Hornsea, HU18 1AP, UK

Labels:

Monday 6 February 2012

How to Sew Sheer Fabric

I think I forgot when I blogged about my assignment, to show you how to sew sheer fabric. So I thought I would do it this week.

Once you have got the pieces cut out on grain, and you have stay stitched them, put the pieces RS together matching raw edges and notches. Pin frequently and hand baste using fairly small stitches.

Pin along the seam allowances to tissue paper under the fabric. Now sew the seam. The tension ought to be a little lower than usual, and you can use a smaller needle than usual, say a size twelve.

Using a short, narrow zigzag stitch sew in the seam allowances.

Now, using small, sharp scissors, cut along the outer side of the zigzag stitching, being careful not to cut the stitches.

Now cut just the paper on the other side of the zigzag stitching. Then carefully tear the paper away from the straight stitching on both sides of the seam.
Press flat and then to one side. Here is the finished result. Yes I know the fabric looks wonky in the photo, the fabric shifts a lot.

NB. If you don't want to use paper, you can use stitch and tear or water soluble stabiliser instead.
Here is a buttonhole on the same fabric, I think it might have been one layer - I can't remember.

The most important thing to remember when sewing sheer, flowing fabric is to pin, baste, and stabilise everything! Also, pinking shears do not work very well with such fabric.


Something else I have learned recently...
This past couple of weeks I have really learned the importance of stay-stitching. Skipping it has ruined my new skirt. The in-seam pockets have stretched out of shape and make my hips look weird. I tried easing them back into shape by sewing the seam onto shorter-than-the-seam cotton tape, but if anything I made them worse. So that's my lesson this week: Always, always, always staystitch, and if it's a loose weave fabric, stay stitch all the way around.

Also, I think I made a miscalculation when I made the pattern. I added half as much ease as I was supposed to (and I was supposed to add 1.5cm which isn't very much). Incidentally, why do American sewing patterns have so much more ease than European ones? The skirt block in Metric Pattern Cutting for Womenswear has minimal ease. I don't think the close-fitting trouser block has any hip ease at all! Even Burda patterns have more than the ones in this book! I'm not saying it's a bad thing to have so little ease, and I realize that the close-fitting trousers are usually made in slightly stretchy fabric, but I will cut extra wide seam allowances, and see if I would like more ease.


An Up-date on Mum's Singer 533
You know Mum and I sent her Singer 533 for a service because it was making all those clunking noises and the tension didn't disengage when I lifted the presser foot? Well, it turns out the man can't fix it. He recommended we go to the factory if we really want it fixing. He can make it straight stitch, but it could do that before. Some people think that if you get a mechanical sewing machine rather than a computerised one you are sure to be able to get it fixed because the parts will be available. Apparently not. Thank goodness I still have my other sewing machines!


The Best Medicines for Colds and Flu Symptoms
It's amazing how many colds I can get in 12 months. I have another one now. If you have a cold I recommend those Vicks Sinex Decongestant Capsules tablets. They actually work, and I'm not allergic to them (I am allergic to the horrible green liquid people try to sell as medicine.)

The best things for sore throats are Strepsils Lozenges. The taste leaves something to be desired, but they do the job, and I've only needed one this time!

Because both Mum and I have colds, we have had to close the shop for a while to keep the heat in. (We live in same building as we have the shop.) Plus, we don't want to pass the cold on to our customers, especially the older ones.


Until next time, wishing you health and happy sewing,
Sabrina Wharton-Brown
The Sewing Corner

Labels:

Monday 30 January 2012

The manual never tells you everything...

This week I found out some things about my Brother XR6600 sewing machine that weren't even mentioned in the instruction manual, all about measurements. Alright, I wouldn't expect some of them to be mentioned because they were just happen-stance, but the first ones on the list, I think, ought to have been mentioned.


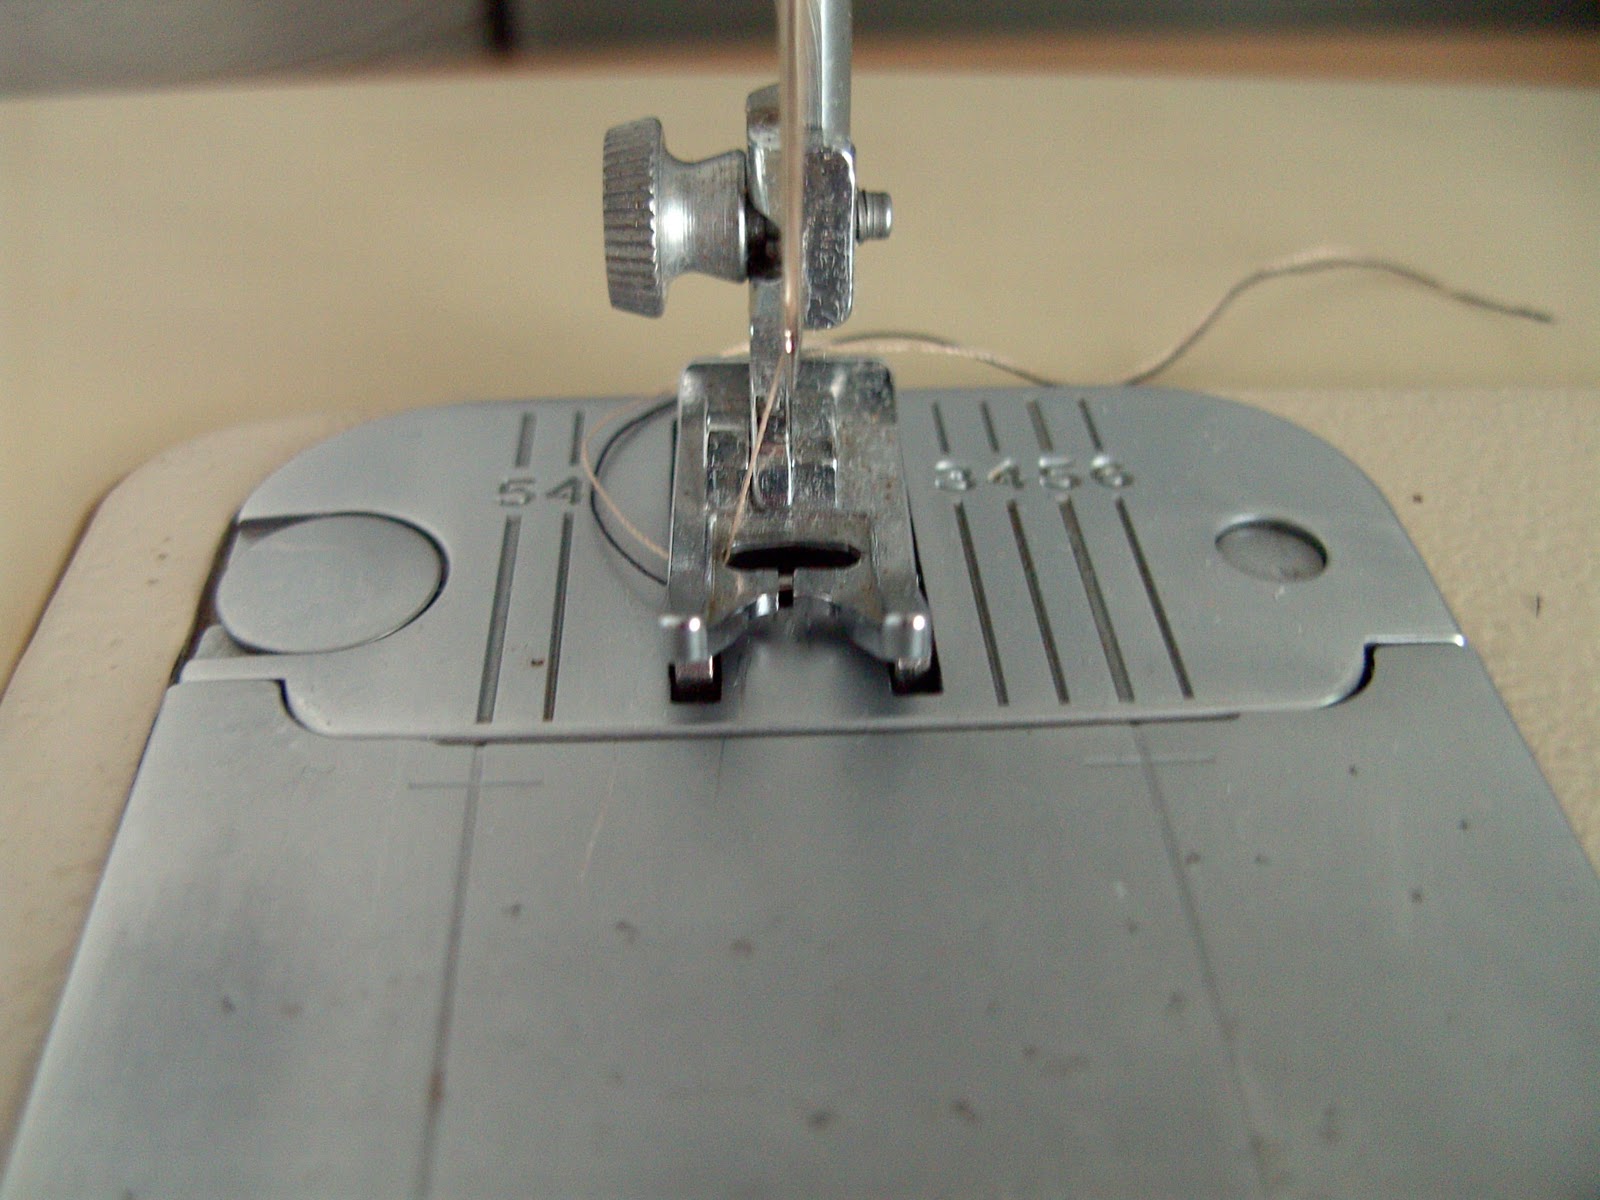
Needle Plate and Bobbin Cover Markings


You see on the bobbin cover those three lines? Well, I thought they were there just for aesthetic purposes, but it turns out that they are measurements. The smallest one is 1/2" away from the needle; the middle one is 5/8" (16mm) away; and the longest one is 3/4" (20mm) away. The end of grid on the needle plate is 3/8" (about 10mm) away. This information should help in turning corners. I used to just gauge it.


Also, the white bevelled edges at the ends of the needle plate (as indicated in the above photo) are both 5.5cm (about 2 3/16") away from the needle when it's in it's original position. Obviously, moving the needle to the right is going to reduce the width-wise measurement. But that can be used to your advantage - if you move your needle 5mm to the right you have a 2" (5cm) gauge.

Presser Feet Measurements
The next set of measurements are to do with the presser feet, specifically the Blind-hem foot (R) and the Overcasting foot (G).

This one is the Blind-hem foot which you may recall from the series I did on its many uses. I mention it here because when the needle is farthest to the left you have a 3mm (about 1/8") margin. This is good for edge-stitching.
This one is the Overcasting foot (G). When the needle is farthest to the left, you get a 6mm (about 1/4") seam allowance, so I guess you could use this foot instead of a Quarter-Inch foot!

I Think I Found Out Why the Stitch Shortens When I Use the Adjustable Zipper Foot

Apparently it's to do with the presser foot width and the feed dogs. The wider your machine can make stitches the farther apart the feed dogs are so you need a wider foot to hold the fabric in place on top of them. Imagine pushing fabric like a sewing machine does, but with your hands. You would have both hands matching; you wouldn't have one hand widthways and the other lengthways. I guess that's how sewing machines are.

Because my sewing machine has 7mm stitches it needs a wider foot or else the stitch shortens. I wonder if the Brother Adjustable Zipper foot would be better? It kind of looks wider in the photos. 

I wonder if the same is true of a Genuine Brother Ruffler? Mine is a no-name one I chose off eBay from America. The product name said Brother Heavy-Duty Ruffler, but lower down on the page under "Brand" it said "For Brother". Very sneaky and not far off false advertising.

An Update on Mum's Singer 533
I tried to fix it but I think I just made it worse, except for getting loads of fluff out (enough to fill a coffee cup) so I'm going to book it in for a service. It's never had one, and we know a man who started out by servicing Singers. Now he has a Janome shop.

It turns out that the machine's upper thread tension should disengage when I lift the presser foot. It doesn't, so something must need fixing. And it was like that when Sarah brought it, so it's not my fault.

I think I'll ask the repairman (Mr Hall) if he can get replacement presser feet because we have only the universal foot and according to the instruction book, it was supposed to come with a zipper foot, a special stitch foot (i.e. a satin stitch foot), and a blind-hem guide (which fits onto the presser foot bar) as well. As it turns out, the presser feet do clip on and off, but it takes quite a bit of effort to get them back on again, not like our modern ones!

Mum's machine is FAST. On the side of the machine it says "Not to exceed 1400 spm". Do you know what you would have to pay to get a machine that fast nowadays? No wonder is was so expensive in 1976! A fast sewing machine actually makes sewing more enjoyable. Mum didn't tell me before, but she always thought my machine was annoyingly slow.

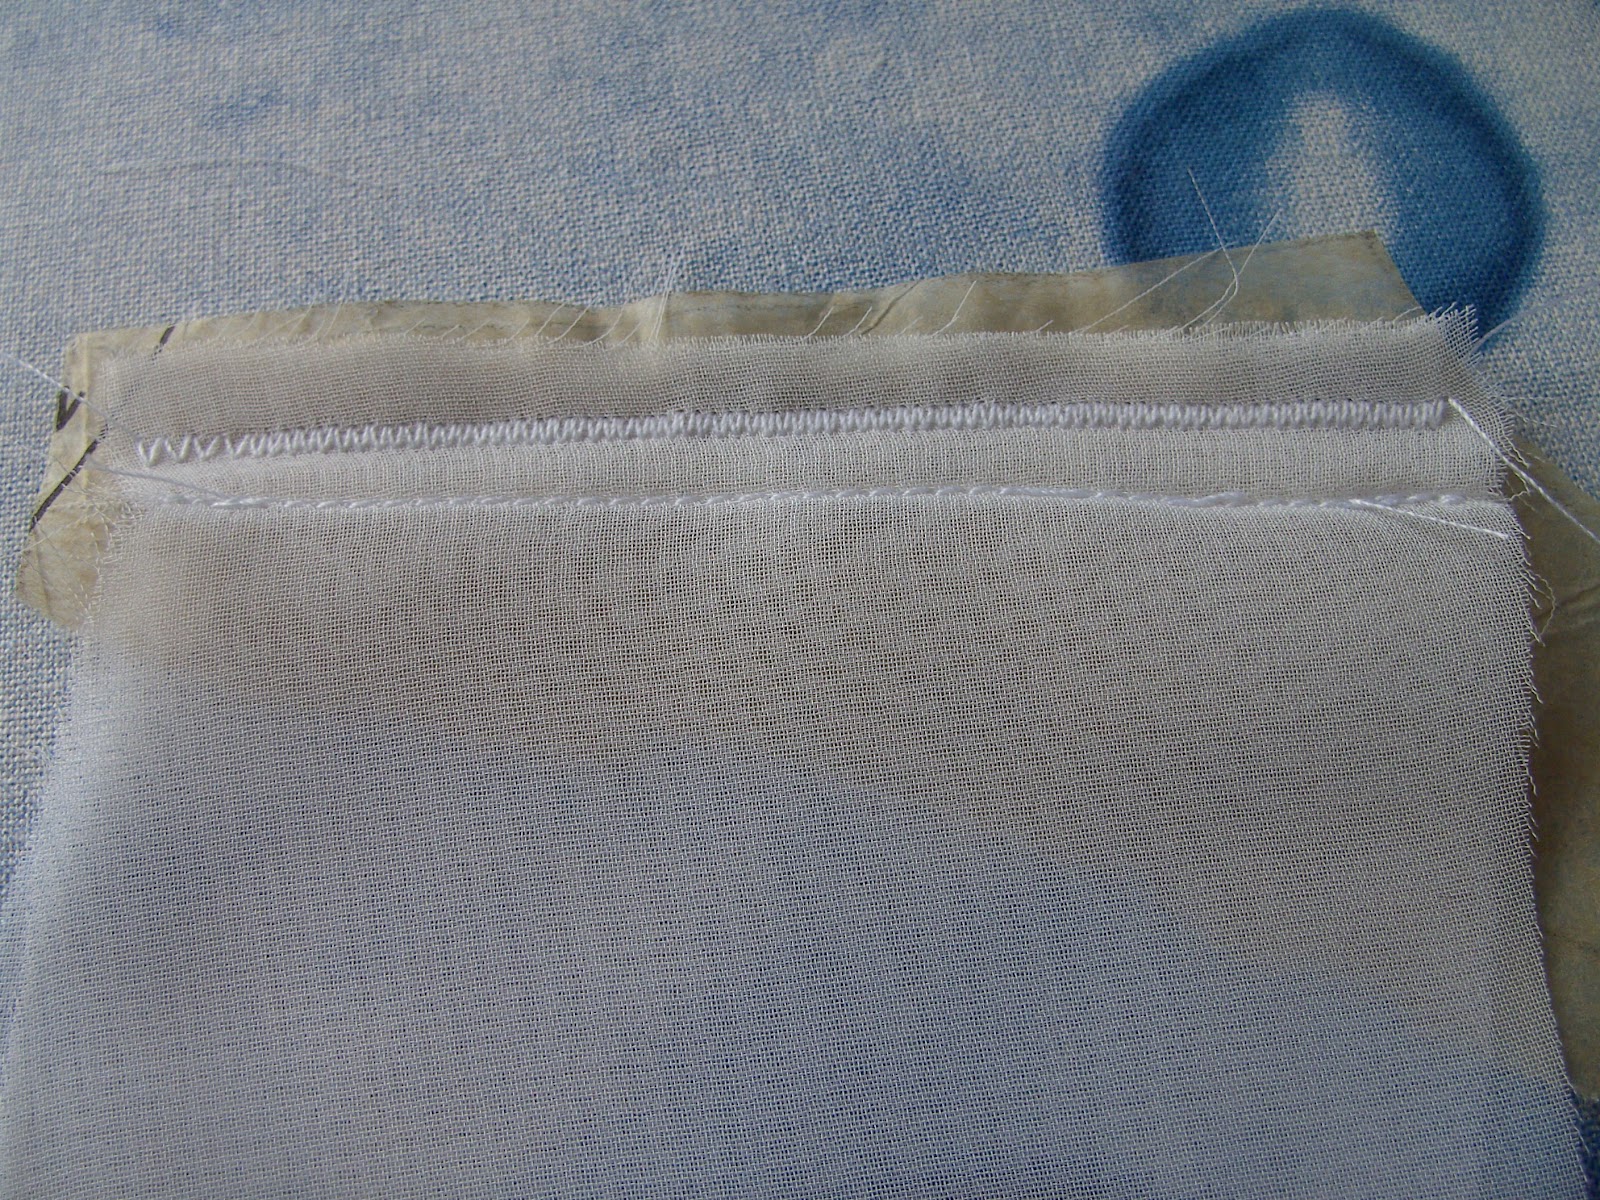
A Bit of Hemstitching with an Ordinary Needle

On of the features of the Brother XR6600 is that you can do hem-stitching with it, which is good if you like heirloom sewing. I had a go at this (only briefly) on a scrap of fabric. You can see the results  in the gold stitching to the right. (Actually the thread is fawn colour, but often ends up looking golden.) 

The hemstitching in black is what I did by hand. I think that is the wrong side of the hand-hemstitching, but it still looks nice to me. I have to say that I prefer my hand-hemstitching, but then I have practised that a bit before, and this was the first time a tried it by machine.

Wouldn't the hemstitching look nice around a short sleeve on a Summer blouse?

P.S. Please ignore the stitching at the top of the fabric - it's WS up so it doesn't look very good.

Have You Tried the Dress-making Courses on Craftsy?
Around Christmastime they had a special offer: two-for-one. So I bought Gertie's Sew Retro Bombshell dress course. (Gertie of Blog for Better Sewing). It's very good. When I bought it I got an e-coupon for my free course, which I saved. 

Then last week or so I got the newsletter advertising the Couture Dress course by Susan Khalje, R.R.P. about $80 with a free Vogue pattern, so I bought it. It's very interesting.

I'm looking forward to Gertie's Starlett Jacket course as well, which I plan to get when it's on special offer because I want a smart jacket.

Benefits of the Craftsy Courses:
  • These courses certainly take the fear out of fitting. It's not as hard as you might think. : ) 
  • They also make me appreciate that you can make many different garments from one pattern, instead of having to buy a new pattern every time you want a new garment. It's more affordable this way, and saves on fitting sessions. 
  • Something else you come to appreciate is that you don't need a bells-and-whistles sewing machine to make wonderful clothes. The machine Gertie uses is a simple entry-level Janome, and Susan Khalje only uses straight stitches on her machine in the video. 
By the way, Craftsy are not paying me to write this; they don't even know I am writing this.

I wish we could put the videos on disc or something so that I don't have to be on the PC to watch them. I'm kind of allergic to computers and hand-held video games. I think it's something to do with the screen. They just numb my mind. I go quite blank. I'm almost zombie-fied - just on autopilot! Once I almost gave away more change than the customer had given me! That doesn't happen if I avoid computers. Now you see why I only blog once a week. : )

Well, that's about it this week.
Until next time, Happy Sewing!
Sabrina Wharton-Brown
The Sewing Corner Haberdashery

Labels:

Monday 23 January 2012

"Home at Last!"

Yesterday my elder sister Sarah, her husband (Mike), and their two little children (Nathan [5] and Libby [almost 3]) came to visit because it was Mum's birthday last Thursday. They would have come on Thursday but Sarah had a bad cold. Anyway, they also brought my Mum's old SINGER 533 sewing machine that she bought in 1976 (when Sarah was about 1 and a half). It's home at last!


It has been up in Sarah's attic for who knows how long getting rusty and changing colour slightly. My first impression after noticing its being rather dirty is that it is very heavy. I could lift it, but I was nearly straining myself. No wonder my Brother XR6600 is considered lightweight!

Something else I noticed is the Singer Red "S" logo. It's not like the one they use now. Look at the picture: In the red S there is a silhouette of a woman sewing. The logo looks big in the photo but it's really only about 12mm (nearly 1/2 ") tall.


Once I scratched the rust off with foil I switched the machine on. It is noisy. Also, having a front-mounted tension assembly, every time I remove the work I have to turn the tension to 0 (unless I'm missing something) because the tension does not automatically disengage like it does on our modern sewing machines.

This machine was quite modern when Mum bought it for £200 (on a payment plan) in 1976. But now even the most basic machines do more and cost less. Imagine what sewing machines will be like 36 years from now - what will they do that people will take for granted? Do you know this machine didn't even come in a box?! The man just delivered it in its snap-on case!

The presser feet are screw-on so Mum didn't change them very often. The zipper foot has gone missing now so there is only the standard presser foot. Even when Mum bought the 533 it didn't come with the special purpose presser foot or the Blind-hem guide that are in the manual. I guess that must be the difference between British machines and American ones - the American ones come with more stuff. Humph.

Stitches
The machine has (I count) six stitches and no automatic buttonhole. The stitches are:

  • straight stitch,
  • zigzag stitch,
  • blind-hem stitch,
  • straight stretch stitch,
  • ric-rac stitch (stretch zigzag),
  • and slant over-edge stitch. 

The latter three can only be used when the machine is set on Flexi-stitch as it is called. (I found the manual at Singer's US website). This is like the S.S. setting on a lot of modern machines. (By the way, what does S.S. stand for? Satin Stitch? Special Stitch? Stretch Stitch?)

Technically you can make buttonholes on this machine but it takes some practice. Mum just made hers by hand. She was taught how to in school. After all, the machines they taught on in those days were hand-crank Singers.

Interesting things about the Singer 533

It has a top-loading bobbin but the bobbin is flatter than my other bobbins. The free-arm is smaller than on both the Toyota and my Brother XR6600, which is better for cuffs and children's armscyes.


It may be because it has been standing redundant for a long time, but the stitch length dial is a little hard to turn and the reverse stitch button takes some getting used to.

Something this machine has that neither of my machines have is a presser foot pressure dial. When you turn it all the way down, it says "D" for darning.


Something that is neat about this machine is that it is "Made in Great Britain" (it says so on the back). Doesn't the gold writing look nice? Try finding a sewing machine (or any machine) nowadays that is made in Great Britain!

There is lots of room to the right of the needle - about 7 3/8"


The bobbin winder has a neat knob to move the bobbin over. It's much easier than having to push the bobbin over. I hope they bring this feature back. : )


Isn't the presser foot small?


I'm not sure how well you can see in the photo, but the seam allowances are in eighths of an inch!

That's about all I've got to say about the machine at the moment. What do you think? Do you have one? Please share your comments below. : )

Until next time, Happy Sewing!
Sabrina Wharton-Brown
The Sewing Corner Haberdashery, 41 Market Place, Hornsea, East Yorkshire, HU18 1AP, Great Britain.

Monday 12 December 2011

How to Make a Dress Part 11: Attaching the Collar and the Bow

This week we will attach the collar and bow.


How to Attach the Collar and Neck-line Facing

Get your collar halves that you made earlier and place them on the RS out dress. Pin and baste along the seam line, or maybe a little inside the seam allowance if you prefer
Then get your neckline facing and place it RS down on top of the collar. Pin and baste. Then sew along the neckline taking the stated seam allowance (in most cases 1.5mm or 5/8").

Grade and notch the seam allowance. Trim the corner near the zip to reduce bulk. Turn the facing to the WS and pin and baste. Press.

With the back seam lines even (along the zip), hand-stitch the facing to the zip tape.

Pin the facing to the dress inside as shown (the sticky-up thing is the collar).

Now hand under-stitch the facing to the seam allowance. A hand under-stitch is basically a backstitch that has a tiny stitch on top and a long stitch underneath. It helps keep the facing in place. Do this all along the neck-line. Press.

Match up the shoulder seams on the facing and the dress. Pin, keeping the facing smooth against the dress.

Now invisibly hem the facing to the dress, with fairly loose stitches, taking up only one thread of the dress fabric at a time.

Turn the dress RS out. As you can see, it is not very neat at the CF of the neckline. That is because of the way I made the collar (see one of the previous posts). It's okay because we're going to cover that up with the bow.

Just overcast the edges by hand to keep them from fraying. You'll probably have to trim them down first.


How to Make and Attach the Bow

Get your two "bow" pieces which were cut on the bias. Place them RS together and sew around from dot to dot. Then trim and notch the edges. Turn RS out.

Tuck the opening's seam allowance in and hand stitch closed.

Top-stitch all around the edge of the bow-to-be.


Fold the bow in half. The fold the long edges over again so that it's kind of like a fan. Then with your sewing machine on a 0 length zigzag stitch, sew in the centre to secure it.


To make the tie get a rectangle of fabric, your pattern will either include the paper pattern or tell the size. I made the paper pattern to go with this pattern (which I made, in case you just found this blog). Stitch along one short end and along the long end.

Now, using a pencil, turn the tie RS out.


Put it in the dress, so that the raw edge is against the point of the neckline and sew it by hand to the facing.

Now place the bow on the dress and wrap the tie around it, tucking it under at the front. Hand stitch securely all around the tie, as invisibly as you can.

I'd have included the photo but the Blogger software decided to hide those buttons. : )

I think that will have to do this week, because I have run out of time. Next week we'll make and sew the inset, and hem the dress. Then we're done!

Hope that helps!

Until next time, happy sewing!
Sabrina Wharton-Brown
The Sewing Corner Haberdashery, Hornsea, HU18 1AP, UK

Labels: ,