Sunday 10 July 2011

The Difference Between Presser feet for Top-loading Sewing Machines, and Front-loading Sewing Machines

I used to wonder why Janome have different categories of presser feet. I don't just mean what the feet do, but for particular types of machines. Well, it's not to do with the shank. They seem to be almost universally the same. It's to do with the shape of the needle hole.


The presser foot on the left is for my Toyota 21-DES -- a front-loading sewing machine. It has a straight needle hole. The presser foot on the right is for my Brother XR6600 -- a top-loading sewing machine. It has a curved needle hole.

Why? What difference does it make which way you put the bobbin into the sewing machine? Well, it's to do with the shuttle hook. In a front-loading sewing machine, the bobbin case and shuttle hook are vertical, and the left-right movement is in a straight line from the needle's point of view.

But with a top-loading rotary bobbin, the shuttle hook moves in a curve in front of the needle. For you to sew a zigzag, the needle must move forward a little at the sides or else the hook wouldn't come near enough to the needle to pick up the thread and form a stitch.

So that's why the needle hole is a different shape on front-loading and top-loading sewing machines (and their presser feet). And now I won't be getting feet for the wrong type of machine! I'd better go and check my Amazon wishlist to make sure I've got the right ones listed! : )

Until next time, happy sewing!
Sabrina Wharton-Brown
The Sewing Corner


The Difference of Thread Quality

Using the right thread is important. Using cheap thread demands a different tension setting and leaves lint in your sewing machine (leading to tension problems later). But what is the difference between a good thread and a bad one?

Good threads are strong, have long fibres, and are relatively smooth; bad ones have short fibres and are fuzzy.

The thread in the top picture is a Coats 100% polyester thread. See how smooth it is?


The thread below is a Korbond polyester thread. This is fuzzy. And it melts if your iron is too hot too long.


I don't know what make this is because I have had it for years and I took the sticker off the spool. I only use it for basting and a bit of hand sewing now, until it runs out. I think it's cotton. It's really fuzzy and if you put thread like this through you sewing machine, you will need a lower tension setting, or the same thread on the bobbin.


As a side note, when you have run out of cheap thread for basting, it is really economical to use Basting Thread or "Tacking Thread" as some call it. You can get 50g (I don't know what that translates to in metres, but it's a lot) for £3.45. It's much better than using your good thread that costs £1.45 for 100m for basting! :)

Until next time, happy sewing!
Sabrina Wharton-Brown
The Sewing Corner

Labels:

Sunday 3 July 2011

How to Sew The Viking Dress from Threads Magazine

I noticed that someone had searched for sewing instructions for the Viking Dress that was in the last issue of Threads Magazine (155). So I figured it out and have made this post with drawings made on Paint (please forgive the less than brilliant drawings).

I hope you'll forgive me, but I haven't included measurements. I would have done, but I thought I had better not, just in case it infringed on copyright. Sorry. Suffice it to say, the dress has to fit on you with ease, and you need extra width for the two straps. Seam allowances are included too.

Anyway, this is what the pattern looks like. Personally I think it looks like a fairytale castle now that I've coloured it in like this.

Your fabric will be in a single layer.

The dress is basically a tube divided into three with godets in the seams. One third of the dress is the front (in pink). The blue pieces labelled 'side back' are mirror images of each other. There are godet pieces: 3 full triangles (dark green) and two half triangles (light green). The brown strip is for two shoulder straps.

First, let's add the godets.

Since the dress is really three peculiarly shaped columns sewn together, we have to make the side/back columns whole. To do this, take one side/back panel and one half triangle. Matching the bottom and keeping raw edges even, stitch them together. Repeat for the other side.

Take two of the full godet peices (dark green) and sew one to each side of the front of the dress (pink).

Sew the remaining godet (dark green) to one of the side back pieces at the blue kick.

Now sew a zip down the centre back seam (as indicated by the red line - it's hard to illustrate such things when you are drawing using Paint) if you need one. Then hem the skirt, and hem the top of the dress.


Cut the straps strip in two lengthways. Fold one of the strips in half lengthways, RS together and sew across one end, and down the long end.

TIP: when you sew across the short end, have a piece of ribbon, thick thread or string at least an inch longer than the strap fabric, laying inside the strap with a bit of the end across the short seam' allowance. This way you can use the long end to pull the strap RS out. Note: I blew the picture up so that it was big enough to see properly. This isn't all of the brown section because it's cut in two and then each of the halves were folded in half.

Snip across the corner that is sewn, near to but not through the stitching. This makes the corner lie flatter.


When you have turned it RS out, snip off the pull and turn in the remaining end. Sew one end to the front of the dress where you want it to be attached, or to the back if you want the dress to fasten at the front like dungarees. Repeat with the other strap and try the dress on. When you have the straps in the finished position, mark it and take off the dress.

Cut the straps to the required length remembering to leave enough fabric to turn the ends in (to finish them) and to sew them to the dress or add buttons. If you are going to sew them there, about 1 inch (2.5cm) will do for turning in and stitching to the dress. If you want buttons, you may like to have a bit extra, depending on the button.

To finish the ends, turn them in  5 eighths of an inch (1.5cm) and stitch the ends closed, either by machine or with a slipstitch by hand. Now you can sew them to the dress. You can do this securely by sewing a square with an X in it like you see on bags. If you are using buttons and buttonholes, sew the vertical buttonholes on the dress part first, and then check the button positions on the straps. You can also use Velcro/hook and loop tape or strong snap fasteners to fasten the dress.

There are many styling opportunities for this dress. For a start, you can make it any length you want, you could add more godets, you can change the way it is opened by adding plackets like on a shirt, you can add trimmings and embroidery. Made in silky fabric it could make a lovely special occasion dress. You could even make this dress for a little girl! If you have any ideas, please share them below! : )

Until next time, happy sewing!
Sabrina Wharton-Brown
The Sewing Corner

Labels:

Sunday 19 June 2011

"How to Do More With Your Blind-hem Foot! Part Three: Edge-joining"

Edge-joining is used to attach "insertions" (ribbons made of lace), ribbons etc. to each other or to fabric with a zigzag stitch. While you can do it with a set blind-hem foot like mine, you can get a better result if you use an adjustable blind-hem foot because you can put the guide in the centre.

How to Use Your Blind-hem Foot as an Edge-stitching Foot


But each of your two pieces of fabric up against the guide on the foot. You may like to hem them first, or to hem the fabric before you join it to an insertion or a ribbon.

Set your zigzag to a width that will catch and hold securely both pieces of fabric. I used 5.5mm wide. Then just stitch, keeping the two pieces butted against the guide as you go.

If you have an adjustable blind-hem foot, you will be able to use a narrower zigzag, but I had to use a wide stitch so as to miss the guide with the needle.

You could also use an over-locking stitch on your sewing machine. If you are going to use a fancy stitch, move the balance wheel by hand for the whole of the first stitch to make sure you won't hit the foot.

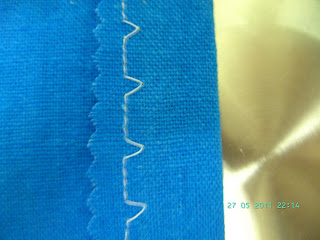
This is what my sample looks like up close:


It doesn't look very neat in the photo, but if I had used a more suitable thread, such as invisible thread, and had been able to use a narrower stitch, it would have looked better. SewBeautifulMag.com/video.html has a video showing this technique with an edge-joining foot, also known as a centre-blade-foot.

Now that you have your edges joined, you could just leave them like that, or you could put ribbon underneath, catching a bead every so often or making a bow. It's really up to you! Do you have any more ideas? Please share them below! : )

Until next time, happy sewing!
Sabrina Wharton-Brown
The Sewing Corner

P.S. Next week will conclude this series of Blind-hem Posts with instructions for Stitching-in-the-Ditch with your Blind-hem foot.

Labels:

Saturday 18 June 2011

"How to Do More With Your Blind-hem Foot! Part Four: Stitch-in-the-Ditch"

If you like to sew your projects quickly, this is a great technique for waistbands, anchoring facings, and probably many other things. You can also stitch-in-the-ditch when you do machine quilting to sew the layers together. There are stitch-in-the-ditch feet available, but why buy something extra when you have a blind-hem foot to do the job already?

How to Stitch-in-the-Ditch with Your Blind-hem Foot
1) Sew the waistband onto the garment RS together. Press, then press the waistband and seam allowance upwards. If you are adding elastic, put it in now, sitting in between the seam allowance and the waistband.


2) Neaten the raw edge of the waistband. Fold down the rest of the waistband's fabric so that it covers the elastic, keeping the raw edge down. The upper photo on the left is what it looks like on the inside of the garment, and the one below it is what it looks like on the outside of the garment.


 3) With the waistband pointing towards the left, put it under the presser foot. I have it this way around because the little kink in the guide bar makes it harder to get in the ditch if it is the other way around.

Move the needle (or the guide if you have an adjustable Blind-hem foot) so that the needle goes right into the ditch. On my Brother sewing machine, this is at 2.5mm from the left on a straight stitch. Sew along the ditch until you get to the end.

If the stitch is still a little visible on the RS, slightly roll the waistband fabric down to cover it, and press.

The photos below show what it looks like when you have finished. The top photo is what it looks like from the RS. It's nearly invisible. The photo below is what it looks like on the inside of the garment. Since this is a sample, I didn't neaten the raw edge.


This technique isn't limited to waistbands. You could also use it on cuffs, or anywhere else you want a fast finish. You can also use it to apply bias binding quickly. Can you think of any other uses? Please share them below in the comments. : )

Until next time, happy sewing!
Sabrina Wharton-Brown
The Sewing Corner

Labels:

Sunday 12 June 2011

"How to Do More With Your Blind-hem Foot! Part Two: Top-stitching/Edge-stitching and Pin-tucks"

Top-stitching is a very easy way to decorate your projects with only a straight stitch. It really looks best when it is neat and and even distance from the edge. With careful attention you can do it well with your standard presser foot, but it is a lot easier when you use your blind-hem foot. Note: You can also use your overcasting foot if you want to be a bit farther from the edge.


It is very easy. Just attach your blind-hem foot, but your folded edge against the guide, and with the needle to the left, stitch. And that's it.

How to Sew Pin-tucks With Your Blind-hem Foot
Since that's not a lot for one post, I'll show you how to make pin tucks with you blind-hem foot as well.

Pin-tucks are very narrow, stitched folds in fabric. If there are enough of them they can make a garment smaller, but if you only have a few, it usually won't make much difference.

Groups of pin-tucks look best when the pin-tucks are parallel, evenly spaced and very neat.

To make a pin-tuck with your blind-hem foot, first fold the fabric where you want the pin-tuck to be, then put the folded fabric under the foot with the fold butted against the guide. Then sew as usual. When you have sewn the pin tuck, sew the next one parallel to it and repeat until you have enough.

You can use these for smocking
If you baste these pin-tucks (fairly close together) instead of stitching them permanently, you can smock them and then release the basting. Smocking looks very pretty on little girls' clothes and on summer blouses. You can really smock just about any fabric, but I should think it would be easier on fabrics with a softer handle. When you smock, you can add a bead to each join. This makes a very nice evening look and can be used on bags too!

Pin-tucks are a classic and very pretty look on summer blouses and dresses. They look best in groups and can be a smart, understated trimming on work blouses and school blouses (I don't know if they are allowed on school blouses, but I don't see why not).

Different Ways to Use Pin-tucks
Pin-tucks needn't be vertical, you can sew them above a hem or anywhere else you would like horizontal lines. You can sew them in one direction and then pin-tuck over those in the opposite direction (vertical then horizontal or vice versa) to make cross pin-tucks. Or you can lay the pin-tucked fabric flat then stitch up across the pin-tucks then down across them a few inches to the left, then up again the same distance to the left and keep going on like that to get a wavy design. 365daysofsewing posted a similar technique on BurdaStyle.com http://www.burdastyle.com/techniques/how-to-sew-scallop-tucks. You can use pin-tucks as narrow dart tucks, or you can sew them on the inside of the garment for a different look.

If you are sewing very light fabric, you can sew with a cord in the tuck and then pull it up to gather. You could do this to the top of doll's house curtains or a doll's garment's waist as well. You could use shirring elastic instead of cord to make it stretchy.

If you are going to make lots of pin-tucks...
...it is best to pin-tuck the fabric before you cut it, because too many pin-tucks will naturally shorten or narrow the fabric and affect the fit. If you pin-tuck right across the width of the fabric, you can use this in the design and have the sleeves cut with pin-tucks near their hems, creating harmony in the design.

Can you think of any other ways to use pin-tucks? Please share them in the comments below!

Next week's post will be about edge-joining with the Blind-hem foot. I suggest you have a go at it rather than judging it by the photo because the photo doesn't look very good. : )

Until next time, happy sewing!
Sabrina Wharton-Brown
The Sewing Corner

P.S. I have started a page on this blog that shows some of my favourite sewing books and things. It's actually an aStore so if you would like the same things, you can get them here. It's the page link on the side bar that says "My Favourite Sewing Books and Things".

Labels:

Sunday 29 May 2011

"How to Do More With Your Blind-hem Foot! Part One: Blind-hemming"

One thing I love is versatility. Many presser feet are very versatile and one of these is the blind-hem foot. If you have an adjustable blind hem foot that is even better, but I have a fixed one. It came with my Brother XR6600. I have 5 uses for it including, of course, blind-hemming. The rest will be covered in the following posts and they are: pin-tucking, edge-stitching/top-stitching, stitching-in-the-ditch, and edge-joining.

Before you begin, you must attach your blind-hem foot. Yours may look a little different and may be adjustable, but this is mine. At the front you can see that it has a metal guide which goes underneath the foot, kinks in the middle for the needle, and then goes back to its regular path.


Use 1: Blind-hemming
When you blind hem by machine, it is not always absolutely invisible -- that is why I usually hem by hand. You will get instead, a little ladder stitch along the stitching line.

To begin, neaten the raw edge and then turn up the hem. (Photo at left.) Then fold it back on itself so that you have a sort of tuck on the RS and the neatened edge is pointing away from the garment. (Photo at right.)


Select the blind-hem stitch (number 9 below) on your machine, or the stretch blind-hem stitch (number 10 below) if you are using stretch fabric like jersey.


You may need to adjust the stitch width on your machine if you can to make sure the needle catches the fabric on the zigzag swing of the stitch. Secure the stitch or leave long thread tails to hand tie. Holding the thread tails neatly out of the way, start stitching. Keep the fold of the fabric butted up against the metal guide on the foot. When you get to the end, secure the stitch or leave long thread tails to tie.


When you have finished it will look like this: The first image is what it looks like when you remove it from your sewing machine; the second is what it looks like on the inside when you turn the hem to its correct position, and the third is what it looks like from the RS. If I had used a perfect colour match, it would have been less noticeable, but I used white thread because I had some of that.


The machine blind hem is good for people who have poor eyesight or have difficulty doing things with their hands, and for those who are in a hurry.

Well, that is the main use of the blind-hem foot, but as I said earlier, there is more. This post has got to be quite long, so I'll put the other uses on subsequent posts.

Until next time, happy sewing!
Sabrina Wharton-Brown

Labels: